Membuat Random Matrix Python

Untuk membuat random matrix di python gunakan perintah:

np.random.randint(Batas bawah, batas atas, size=(baris, kolom), dtype=tipe)

contoh:

>>> np.random.randint(1,255,size=(1,5))

array([[ 72, 193, 40, 162, 210]])

>>>np.random.randint(1,15,size=(3,2))

array([[ 1, 13],
[13, 13],
[ 4, 10]])

>>> np.random.randint(1,15,size=(3,),dtype=uint8)

array([12, 5, 11], dtype=uint8)


Linux Benchmark

Linux Stress Testing and Benchmarking

Live CD

Phoronix Test Suite Live – a stripped down linux environment designed around the Phoronix Test Suite

stresslinux – stresslinux is a minimal linux distribution running from a bootable cdrom, usb drive, or via PXE

Monitoring

lm sensors – monitor fans, voltages, and temps

hddtemp – monitor hdd temps

smartmontools – monitor hdd’s using the SMART system built into the hard drive

Benchmark Suites

Phoronix Test Suite – comprehensive testing and benchmarking suite

freebench – free memory, integer, and floating point benchmark

lmbench – portable benchmark suite

ltp – the Linux Test Project benchmark suite

nbench – BYTE Magazine’s BYTEmark tests memory, integer, and floating point performance

xfbsuite – benchmark suite for X

CPU tests

Code:

# time make

when it is done, it will display the overall time it took to complete, which you can then throw in to a text document or spreadsheet to graph, if you’d like.

CPUBurn – stress the cpu

gamut – loopable benchmark app (formerly Sstress)

Mersenne Prime (GIMPS) – Includes a stress test which is identical to it’s Windows counterpart

super pi – calculates pi, same as it’s windows counterpart

stress – places a configurable load on different parts of the system: CPU, memory, I/O, and disk stress

System Stability Tester – gui pi calculating program

Memory Tests

Memtest86+ – can be added to your LILO or GRUB boot menu, so you do not need to have a floppy disk

Graphics Tests

SPECviewperf 9 (32bit and 64bit)

Unreal Tournament 2003/2004 – You can use fly-by’s and botmatches to benchmark

Doom3 – you can use timedemo’s to benchmark

Filesystem I/O

Bonnie – Performance test of filesystem I/O using standard C library calls.

Bonnie++ – Filesystem I/O tester

dbench – filesystem benchmark

iozone – filesystem benchmark

piozone – filesystem benchmark

tiozone – fully threaded filesystem benchmark

Network Tests

netio – network benchmark

nepim – network test

netperf – network test

iperf – network test

Program Benchmarks

bootchart – benchmark your boot process

contest – benchmark different kernels to see which performs best on your system

httperf – HP tool to test webserver performance

jmeter – benchmark the performance of http/ftp services and databases

MySQL Super-Smack – MySQL benchmark

pipebench – measures stdin/stdout communication

siege – http performance test

volanomark – java server benchmark

Articles and HOWTO’s

Linux Overclocking Software (Phoronix)


Node MCU dengan Arduino IDE

Berikut tahapan untuk melakukan pemrograman NodeMCU dengan menggunakan Arduino IDE

1. Download Arduino IDE terbaru di situs: https://www.arduino.cc/en/Main/Software

2. Jalankan aplikasi arduino

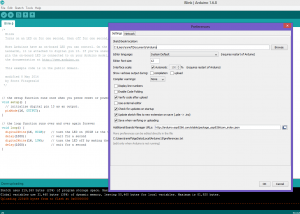
3. Akses menu File > Preference pada Arduino

4. Input url berikut: “http://arduino.esp8266.com/stable/package_esp8266com_index.json” pada bagian “Additional Boards Manager URs” seperti ditunjukkan dalam gambar berikut:

arduino-preference

5. Klik OK

6. Akses Menu Tools > Board: > Board Manager, kemudian pilih Board ESP8266 kemudian klik install. Maka akan dilanjutkan dengan proses download addon board esp8266 untuk IDE. Proses ini memakan waktu cukup lama, ukuran addon board ini sekitar 180MB.

instalasi-arduino-board-nodemcu

Mekanisme instalasi offline akan menyusul

7. Setelah instalasi selesai pilih board NodeMCU, yang saya gunakan NodeMCU 1.0

arduino-board-nodemcu

Setelah board NodeMCU terpilih, tampilan pada tools akan bertambah beberapa opsi.

9. Pilih port serial/COM Port yang sesuai, dan IDE Arduino sudah siap untuk melakukan pemrograman NodeMCU.

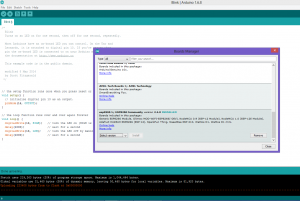
Setelah tahapan konfigurasi selesai, saatnya kita mencoba membuat aplikasi sederhana untuk menguji, Kita akan mencoba menguji dengan membuat lampu kedip/blink dengan memanfaatkan contoh yang sudah ada pada IDE Arduino. Tahapan menguji sebagai berikut:

1. Buka contoh program arduino pada menu File > Example > 01.Basic > Blink

2. Salah satu hal yang harus diperhatikan adalah default library pada Arduino IDE untuk NodeMCU sangat berbeda dengan Board Arduino. Penomoran port pada NodeMCU mengikuti daftar berikut:

static const uint8_t D0 = 16;
static const uint8_t D1 = 5;
static const uint8_t D2 = 4;
static const uint8_t D3 = 0;
static const uint8_t D4 = 2;
static const uint8_t D5 = 14;
static const uint8_t D6 = 12;
static const uint8_t D7 = 13;
static const uint8_t D8 = 15;
static const uint8_t D9 = 3;
static const uint8_t D10 = 1;

 Artinya untuk menampilkan data pada port D0 maka nomor pin yang digunakan pada program adalah 16

3. Untuk menampilkan blik pada led internal yang ada pada NodeMCU maka kita gunakan port 0.

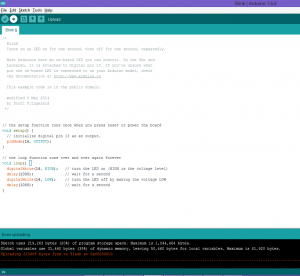
4. pada program Program Blink port 13 kita ubah menjadi 16

void setup() {
// initialize digital pin 13 as an output.
pinMode(16, OUTPUT);
}

// the loop function runs over and over again forever
void loop() {
digitalWrite(16, HIGH); // turn the LED on (HIGH is the voltage level)
delay(1000); // wait for a second
digitalWrite(16, LOW); // turn the LED off by making the voltage LOW
delay(1000); // wait for a second
}

Contoh-program-arduino-board-nodemcu-blink

5. Setelah itu klik tombol Upload, maka tahap compile dan upload akan di proses, dan perhatikan notifikasi pada layar bagian bawah. Jika tidak ada error, maka LED pada NodeMCU akan berkedip sesuai dengan program contoh yang dibuat.

Qlikview Server: Reactivate reload service

For QlikView 11 on Windows 2008 to restaure the Reload Tab after removing the publisher licence

you must change the IsPublisher=”true” to IsPublisher=”false”in the following file:

C:\ProgramData\QlikTech\ManagementService\QVPR\DistributionService.xml


Ex.:

. . .

</xs:schema>

<DistributionService . . . IsPublisher=”false”  . . . />

</NewDataSet>


1. Stop QlikView Services

2. Backup the file DistributionService.xml

3. Change IsPublisher=”true” to IsPublisher=”false” on the line <DistributionService

4. Start Services.


Baris baru pada string (Delphi)

Dalam Delphi, untuk membuat baris baru digunakan kode ASCII #13#10. Dimana #13 adalah kode ascii untuk Carriage Return (CR) dan #10 adalah LineFeed (LF).

Contoh :

Label1.Caption := ‘Baris Pertama’ + #13#10 + ‘Baris Kedua’;

akan menghasilkan:

Baris Pertama

Baris Kedua


Thx

rarief

Networking Named Content

Berikut bahan pembahasan untuk kuliah Jaringan Komputer. Jacobson berusaha menawarkan konsep efisiensi pencarian data. Mengingat dalam dunia maya saat ini, hal apakah yang lebih penting ? penyedia data atau data itu sendiri. Kita lebih mementingkan asal data tersebut atau bagaimana mendapatkan data secepat-cepatnya tanpa perduli siapa penyedia data ?

Berikut bahan bacaan :  Networking Named Content

File presentasi SIM-PT

Download File Presentasi SIM-PT:  SIMPT-UB ok (1)

webo

Test Webo

web ub fp

IPv6

Mengapa harus IPv6

IPv6-indonesia

Reference:

rariefsetyawan.wordpress.com

Renesas R8C Programming – UART

Pemrograman baud rate serial port pada mikrokontroller Renesas R8C bergantung pada frekuensi kristal yang digunakan. Register internal yang berhubungan dengan kecepatan transfer adalah U0brg untuk Serial 1 dan U1brg untuk serial 2.  Rumus umumnya adalah:

Rxbrg=freq.kristal/(baud-rate * 16) – 1

Jadi misalnya kita menggunakan kristal dengan frekuensi 12 Mhz, dan kita ingin agar mikrokontroller renesas berkomunikasi dengan komputer menggunakan UART 1 dalam kecepatan 9600 bps maka nilai brg yang harus di input adalah :

R1brg=12000000/(9600*16)-1

R1brg=77.125 atau dibulatkan menjadi 77

Dari rumus tersebut diperoleh tabel berikut

Baud rate

12 Mhz

20 Mhz

nilai brg pembulatan nilai brg pembulatan
9600 77.125

77

129.208333

129

19200 38.0625

38

64.1041667

64

38400 18.53125

19

31.5520833

32

57600 12.02083

12

20.7013889

21

115200 5.510417

6

9.85069444

10

Dalam pemrograman menggunakan HighPerformance Embeded Workshop (HEW) dengan bahasa C dapat dituliskan sebagai berikut :

clk0_u1c0 = 0;
clk1_u1c0 = 0;
u1brg = 77;
Dan untuk mengaktifkan dapat digunakan register:
#UART1_PENGIRIM_AKTIF
te_u1c1 = 1;
#UART1_PENERIMA_AKTIF \
re_u1c1 = 1;
Demikian sekilas tentang pemrograman MCU renesas R8C